Create a tutorial
- Title of this manual
- Introduction of this repair manual
- Photo of the product
- Short description of a step
- Explanation at a step
- Image or movie at a step
- Add a step
- Saving a manual
- Adjust the order of the steps
- Find your manuals
Creating a repair manual on Jafix.com is very easy.
You start creating a repair tutorial by clicking on "Create a repair tutorial" in the main menu.
A repair tutorial consists of a general part and a step-by-step explanation of how to carry out the repair.
We will now take you through the various fields that must be completed.
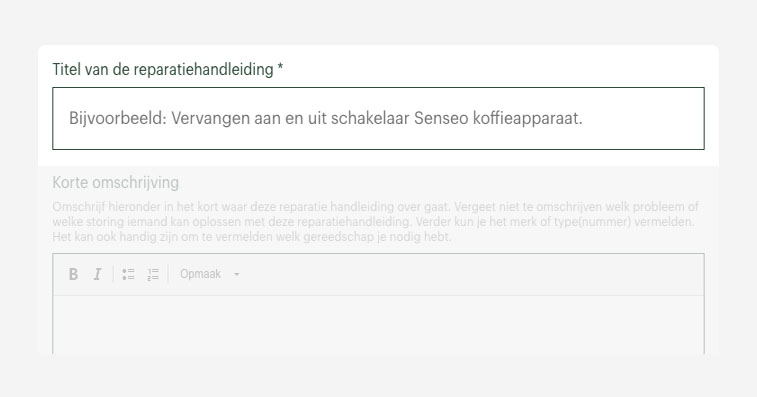
Title of the repair manual
The first field is the title of the repair manual, this is a mandatory field.
In the title you briefly describe which product or object it concerns and what someone can repair with this repair manual. For example, "Replace the on- and off switch for Senseo coffee machine." or "Repairing a rip in a jeans".
The title is not only shown in the repair manual itself, but also on pages with overviews of repair manuals. So it is important for the other users of Jafix.com that the title explains briefly and clearly what the repair manual is about.
Short description
The next field is the short description.
In this field you go into more detail about what someone can expect from the manual. Just like in the title, but a bit more extensive.
- In any case, indicate which problem or which malfunction someone can solve with this repair manual.
- Also a good idea; what were the symptoms when it turned out that the device stopped working?
- You can also tell a little more about the brand or type (number) of the product or object in the repair manual.
- It can also be useful to state which tools are needed.
- And finally, how much time it will take to perform the repair.

Photo of the product
Time for picture! This photo - you can choose one - is a photo of the product covered in the repair manual.

You can add a photo or image to the repair manual in two steps:
1 - First click on the 'Select' button.
- With the option 'Choose file' you can select the photo you want to upload from your computer.
- Click 'Save', the photo has now been added to your media library. This way you can use the image or photo as often as you want without having to upload it again and again.
Tip 1! If you have uploaded photos before, you will find them here. If you want to use earlier added photos, select one and choose 'Insert selected image'.
Tip 2! Did you choose the wrong photo? Then click on 'Delete'
2 - Now add the photo to the repair manual by clicking on 'Insert selected'.
Step-by-step explanation of the reparation.
A step can consist of a text, a photo or a video in any combination. If you feel that a textual explanation for this step is enough, then that's fine, or just a photo or video? Also fine. As long as the step is as clear as possible to the user.
Brief description of the first step
In this field you briefly describe which action is carried out in this step. For example, "Remove the bottom plate of the coffee maker." or "Disconnect the car battery"

Explanation
In this field you will go deeper into everything that needs to be done in this step. Describe as clearly as possible how this step should be carried out. If you are going to add a photo or video in this step that does not need any further explanation, just leave this field empty.

Image or movie at this step
Now you have the option to add a photo or video to your manual. Therefore, embed a YouTube or Vimeo video, or upload one.
Tip! If you think that a textual explanation is sufficient for this step, then leave it at that.
1 - Click on the 'Select' button
2 - Select the type of file you want to upload.

- 'Image' for uploading a new image or selecting one of your earlier uploaded images.
- 'Video' for uploading a video from you computer
- 'Video Embed' for embedding a video from YouTube or Vimeo
Tip! If you have previously uploaded photos or videos, you will find them here. If you want to use one of those files, select it and click 'Insert selected image'.
3 - With 'Choose file' you can select the photo or video you want to upload from your computer.
4 - If you choose 'Video embed', you can copy and paste the URL or link to the video here.
5 - Once you are ready selecting a photo or video click 'Save', the photo or movie has now been added to your media library. This way you can use the films or photos as often as you want without having to upload them again and again.
Tip! Did you choose the wrong photo? Then click on 'Delete'
5 - Last step; click 'Insert selected image' to add the video the tutorial.
Add a step
It's possible that a manual consists of only one step, for example a clear instruction video. But often a really good manual will consist of more than one step.
In that case, click on 'Add step' to add a new step to the repair manual.

Save the new manual
Are you ready with the repair tutorial? Then save and publish it.
Not finished yet and would you like to continue working on the repair manual later? Then click on 'Save as draft'.

You can find your repair manuals (published and drafts) on your profile page.
Adjust the order of the steps
It's quite easy to change the order of the steps.
At the top left you will find a double arrow, by which you can drag the steps and change the order. This is easiest if you minimize the blocks first. Do this by click 'Collapse'.

When you finished adjusting the order, don't forget to save the tutorial.
Location of the tutorials
All of your manuals - published and drafts - can be found on your profile page. You get there by moving your mouse over your profile in the main menu and choose 'My tutorials'
